By Seminar Information Systems (WS17/18) | February 18, 2018
Image Captioning
Authors: Severin Hußmann, Simon Remy, Murat Gökhan Yigit
Introduction
Image captioning aims for automatically generating a text that describes the present picture. In the last years it became a topic with growing interest in machine learning and the advances in this field lead to models that (depending on which evaluation) can score even higher than humans do. Image captioning can for instance help visually impaired people to grasp what is happening in a picture. Furthermore, it could enhance the image search of search engines, it could simplify SEO by automatically generating descriptions for the pictures or improve online marketing and customer segmentation by identifying customer interests through interpreting their shared images via social media platforms. Nevertheless image captioning is a very complex task as it goes beyond the sole classification of objects in pictures. The relation between the objects and the attributes have to be recognized. Finally, these information must be expressed in a natural language like English.
The goal of this blog is an introduction to image captioning, an explanation of a comprehensible model structure and an implementation of that model. Out of the scope is a tutorial to develop a high end caption generation model that is fine tuned to compete with the state of the art models. We rather focus on the basic understanding of the topic and the application of a basic model. Our tutorial orients itself on the one by Jason Brownlee, published on his blog.
Outline
- Image Captioning - Authors: Severin Hußmann, Simon Remy, Murat Gökhan Yigit
- Introduction
- Data Preparation
- Set up Caption Generation Model
- Caption Generation
- Evaluation
- Summary
Environment Requirements
To follow this tutorial, we recommend to setup a development environment with Python 3 or higher and assume you to have the following packages installed:
- Keras (with either TensorFlow or Theano backend)
- NumPy
- HU-flickr8k-helper
The last package was developed by ourselves and provides several helper functions to handle the Flickr8k dataset. That way, we can focus on the interesting parts of developing an image caption generation model. For further information, please take a look at the package documentation. Install the package as following:
pip install HUFlickrHelper
And import it at the top of your project:
import HUFlickrHelper as hfh
We recommend to create a variable to store the path to your working directory. When ever you call a file, you don’t need to type the complete path over and over again. This way your code will be less redundant and easier to read.
wd = 'H:/Information Systems/'
To help you to get started we collected all necessary import packages below. Paste them at the top of your project:
Dataset
There is a wide variety of datasets to choose from but not all fulfill the requirements necessary for appropriate image captioning. There is a lot of problems with just scraping images with captions e.g. from Flickr, Facebook or from news sites. When people upload images, they don’t describe what is actually in the image but rather give information about what cannot be seen in the image. People make this to not annoy their friends or followers by stating the obvious. So therefore, if you aim to achieve a description, that states what is happening in the image, it is not ideal to train the model with such data.
This is an example from the news site BBC. The description of the picture is a bad example because it doesn’t really describe what is going on in the picture and wouldn’t help at all. A good example in this case would be “People are sitting in an airplane”. But since this would be stating the obvious, you can’t really find this type of content widely on the internet. The description in this case presumes that we already understand what is going on and gives some additional information to it.
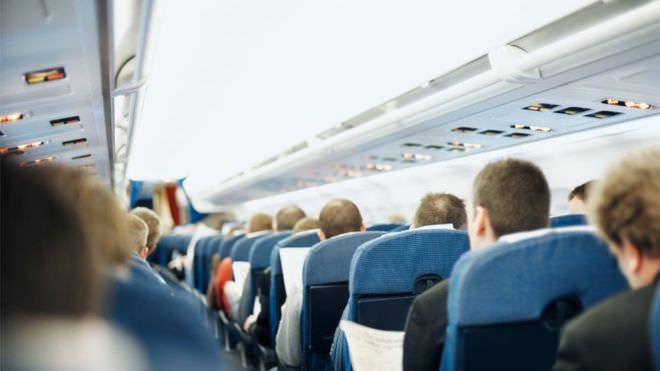
Figure 1: A review is being launched into airlines' seating policies, the Civil Aviation Authority says. Source [BBC](http://www.bbc.com/news/uk-42931091).
Another bad example is this description. This is from the IAPR-TC 12 dataset, which is described by actual people. They only have one description and they are usually too detailed and also describe things that don’t matter. As you can see in the figure the caption is very long and describes things that are irrelevant in order to understand what is going on in the picture. For example, the color of the roof of the houses in the background is not of matter neither are the “wooden mountains” in the background which, with bear eyes, is not identifiable if it is grass or trees from this distance. What would matter in order to understand the content of the image would be the grey truck driving on the street and maybe the little park on the side.
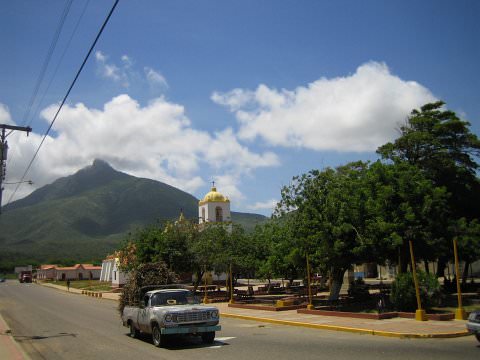
Figure 2: "A grey, loaded pick-up truck is driving in a grey street in the foreground; a white church with a yellow roof, white houses with red roofs and dark green trees behind it; a dark green, wooded mountain and white clouds in a blue sky in the background." From the IAPR-TC12 dataset by Grubinger et al. [[1]](#references)
So enough of the bad examples, let’s look how a “good” dataset should look like. An image caption after Hodosh et al. (2013) [2] should do a conceptual image description. There are three different ways to describe images that are commonly distinguished: conceptual, non-visual and perceptual. While non-visual description explains itself, perceptual descriptions are such, that capture low-level visual properties of images. Since we are not interested in non-visual elements and since we use a pre-trained model and don’t need low-level properties, we need conceptual descriptions of images. Conceptual descriptions identify what is depicted in the image. While things in the images may be abstract, image understanding is mostly interested in concrete descriptions of the depicted scenes and entities, their attributes and relations as well as the events they participate in. Also the conceptual image description should be generic and not too specific in order to be able to generally describe images.
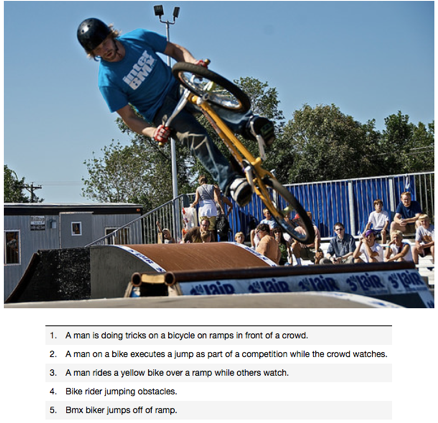
Figure 3: Picture and its five corresponding descriptions, from the Flickr8k dataset by Hodosh et al. [[2]](#references).
The Flickr 8k dataset [2], which is often used in image captioning competitions, have five different descriptions per image, that provide clear descriptions of the noticeable entities and events and are described by actual people. Different persons have different ways of describing things that are happening, therefore it is important to gather information from different perspectives. The average length of their descriptions is nearly half as long as the descriptions from the IAPR-TC12 dataset, which leads to only relevant element description. The people that described the images were told to describe the people, objects, scenes and activities that are shown in a picture without having any further information about the context in which it was taken. The result were conceptual descriptions that focus only on the information, that can be obtained from the image alone.
The dataset has 8000 images from Flickr and contains people and animals (mostly dogs) performing some action. We used ¾ of the data for training and ¼ for evaluation.
Data Preparation
In this part you will learn how to prepare the image and text data.
Image Data
In order to work with the image data in the following, we need to generate image features out of each image. To do so, we use the VGG 16 CNN developed by Karen Simonyan and Andrew Zisserman [1]. A pre-trained net saves us a lot of work and time because we don’t need to develop and train an extra model to obtain image features. Especially training would be very time-consuming.
Since the VGG 16 model was originally developed for image object recognition we have to make some adjustments. After we get the VGG16 object, which is part of the Keras package, we need to get rid of the last layer, which is a softmax layer and performs the classification task.
The following setup_vgg16() function calls the VGG16 object from Keras, deletes the last layer and fixes the output. As a result, it returns the modified VGG16 model.
By calling extract_feature() we can generate an image feature using the modified VGG16 model. To do so we have to pass the image to the model calling the load_img() function and make some image pre-processing which the VGG16 model requires.
In the end, the model returns a 4,096-element vector.
The get_features() function combines both previously defined methods and offers a handy way to generate features either for multiple images, by passing a directory or for a single image. However, the function returns a dictionary which maps the image identifier and its feature.
Since it takes some time to generate all features for the dataset, it makes sense to save the dictionary for later use. You can use the save_features() function from our helper package to do so. Just pass the dictionary and a path and the features will be saved as a .pkl file.
Text Data
As already described, the dataset provides five captions for each image and is split in a training, test and development set. Each set contains a bunch of image identifier. Let’s start by importing the training set. You can easily use the load_imageID_list() form the helper package do to so.
In the next step, load the descriptions form Flickr8k.lemma.token.txt. Again, use the load_descriptions() function from the helper package and store the descriptions in raw_desc. The function takes as parameters:
- the path to the Flickr8k.lemma.token.txt file
- the
datasetobject
As the variable name indicates, we need to pre-process the text data before we go on. In order to do so, call the prepare_descriptions() function and pass the raw_desc as the parameter. The function applies standard natural language operations to the data like:
- lowercase all words
- remove punctuation like .,-<>()
- remove hanging ‘s’ and ‘a’
- remove numbers
This will reduce the size of our vocabulary, which benefits the model performance later. Of cause, this also has a downside, since we discard data but we will come back to this in the last part of the tutorial. Save the cleaned data to cleaned_desc.
If we would talk about movies we had to add a big spoiler mark now because we have to add something which may not make much sense so far but will be very important later. Long story short, we need to wrap each caption into an artificial start and end sequence. We will explain this in the part “Setup Caption Generation Model” in more detail.
Let’s define a function wrap_descriptions(), hand over the cleaned_desc and optional a start and end sequence. If you will not go with the default ones, be aware that these sequences must not already exist in the captions and do not contain spaces.
The function iterates over the descriptions by the image identifier and wraps each description into the start and end sequence and returns the updated dictionary.
Again in order to save some time, let’s save the pre-processed and wrapped descriptions. Use the function save_descriptions() and hand over the wrapped_desc object and a path including a file name.
Let’s take a quick look at the data. For example, choose the first key in the dictionary and inspect how the descriptions changed in the pre-processing process:
Take away from this part:
In this part, you learned how to …
- … import and use a pre-trained VGG16 model
- … generate image features
- … load and pre-process image descriptions of the Flickr8k dataset
Set up Caption Generation Model
In this part of the tutorial, you will learn how to develop and implement a deep learning model to generate image captions. We will also take a look at how to modify the text data in order to train the model and finally train it.
But first, let’s think about how the caption generation process should work in the end. As our goal is not to map an image to a specific caption but rather learn the relationship between image features and word sequences and between word sequences and single words our target is not a complete caption in the dataset but a single word. In other words, the model generates a new caption word by word based on a given image feature and a caption prefix. In the beginning, each caption only contains the artificial start sequence (which we introduced in the previous part). We also need the image feature of the image the model should describe in the end. Both, the caption and the image feature vector will be passed to the model. The model will predict the word from the vocabulary which has the highest probability to follow the given caption prefix in combination with the image feature. The predicted word will be appended to the caption and will pass to the model again. As you noticed this is an iterative process, which will terminate in two ways. The first stopping criteria would be, that the model predicts the artificial end sequence as the next word. The second one is given by an upper bound of the caption length. We have to specify this bound in advance, which will also have an influence on the model’s structure later. Either way, the model will terminate and output the generated caption. We illustrated the process in the flow-chart below.
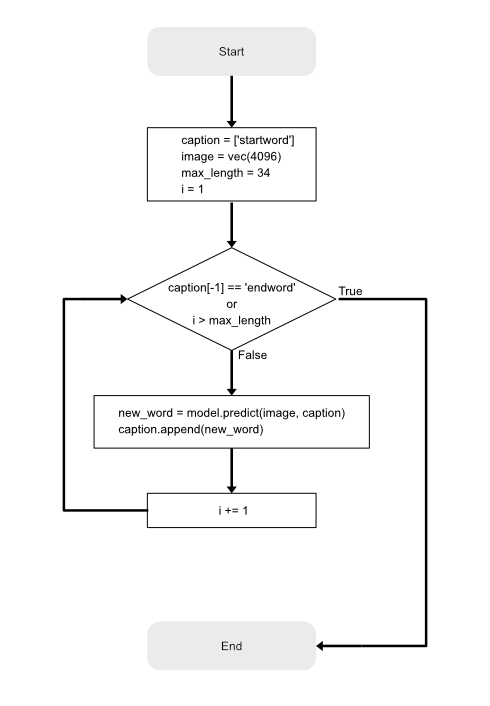
Figure 4: Flow-chart of the caption generation process.
Model Structure
“What is the most suitable model structure?", this may be one of the most important questions whenever developing a neural net. This question is not an easy one and can not easily be answered. A model will always be developed for a specific task, therefore no general answer can be given. However, there is some research about how to come up with a good model structure for a given task. In the field of image captioning Marc Tanti, et al. [2] compared 16 different model architectures and determined the best one. In this tutorial we will follow their merge-add architecture, which is depicted in Figure 5 below:
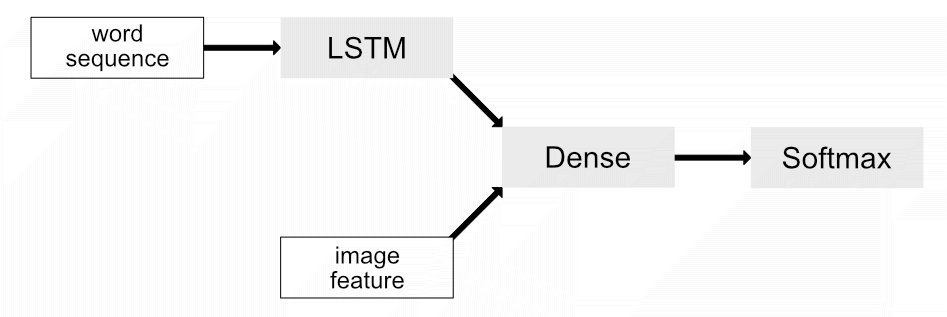
Figure 5: Merge-add architecture by Marc Tanti, et al..
This model architecture takes tow vectors as inputs:
- image feature vector
- word sequence vector
As you can see, the vectors get injected into two different parts in the model. Marc Tantie, et al. came to the conclusion, that models, where the text data and the image information are handled exclusively perform better. Later in the model, both vectors get merged. Since models with an LSTM layer performed slightly better than models with RNN layer in their experiments we will go with this approach.
After the LSTM layer processed the word sequence (in the following caption prefix) its output will be merged with the image feature vector. This merge step can be realized in the ways:
- merge-concat: Concatenate the image feature vector and the caption prefix to one vector. The resulting vector has the length of the sum of the length of the input vectors.
- merge-add: Add elementwise image feature vector and caption prefix vector together. The resulting vector has the same dimensions as the input vectors.
- merge-mult: Multiply elementwise the image feature vector and caption prefix together. The resulting vector has the same dimensions as the input vectors.
A clear downside of the concatenate approach is the increase of dimensions of the resulting vector, which results in a more complex layer and requires more computational power in the end. In the following, we will go with the merge-add approach.
The last layer of the model, a softmax layer, finally outputs a probability distribution for all words in the vocabulary. In order to get the next word in the caption prefix, we only need to choose the word with the highest probability.
Now you learned a bit more about the theoretical background, let’s see how we can implement our knowledge in Python, using Keras:
Implement the define_model_structure() function as following:
Image feature input
The first input takes the 4,096-element image feature vectors (which we generated here). Therefore its input shape has to be of the same size as the vector. We add a dropout layer to prevent overfitting with a dropout rate of 0.5 and compress the vector size to 256 elements in a dense layer (using a Rectified Linear Unit (ReLU) function).
Caption prefix input
The second input takes the caption prefix vector. The shape of this input may vary. Basically, it acts as an upper bound of the caption length the model will be able to generate later (see again here). Intuitively it would not make sense to train the model to predict longer captions as in the dataset, which represents the ground truth. Use the get_max_length() function to get the number of words of the longest caption in the dataset later. The flat_descriptions() function is part of our helper package.
The next layer is an embedding layer. We need this to handle a zero padding we may need to add to the caption prefix later. This way we can tell the model to ignore the padding because it does not contain any information for the model to learn. We also increase the dimension of the input vector to 256 elements and apply a dropout rate of 0.5 to the data. Finally, we pass the data into the LSTM layer of the model.
Merge and prediction step
After the caption prefix vector got processed by the LSTM layer and the image feature vector also got compressed to the same dimensions they get merged by a simple add layer. The layer adds both vectors elementwise into a single vector by preserving the original dimensions of the input vectors. Afterward, the vector gets past into another dense layer with a ReLU activation function. The last layer in the model is also a dense layer. Instead of a ReLU function, it uses a softmax function in order to create a probability distribution over the complete vocabulary. In other words, it predicts for each word the probability to follow the given caption prefix in combination with the image feature. Therefore the size of the output layer has to be equal to the number of unique words in the vocabulary. Use the get_vocab_size() function to obtain this number.
As suggested in the literature, we use a categorical cross-entropy cost function, since our target variable is in categorical format (see next part for details) as well as Adam as optimizer method.
The handy plot_model() function, which comes with Keras, plots any model structure and saves it as a picture. This way you can quickly get an overview of a model. This is how our model looks like (we added the boxes):
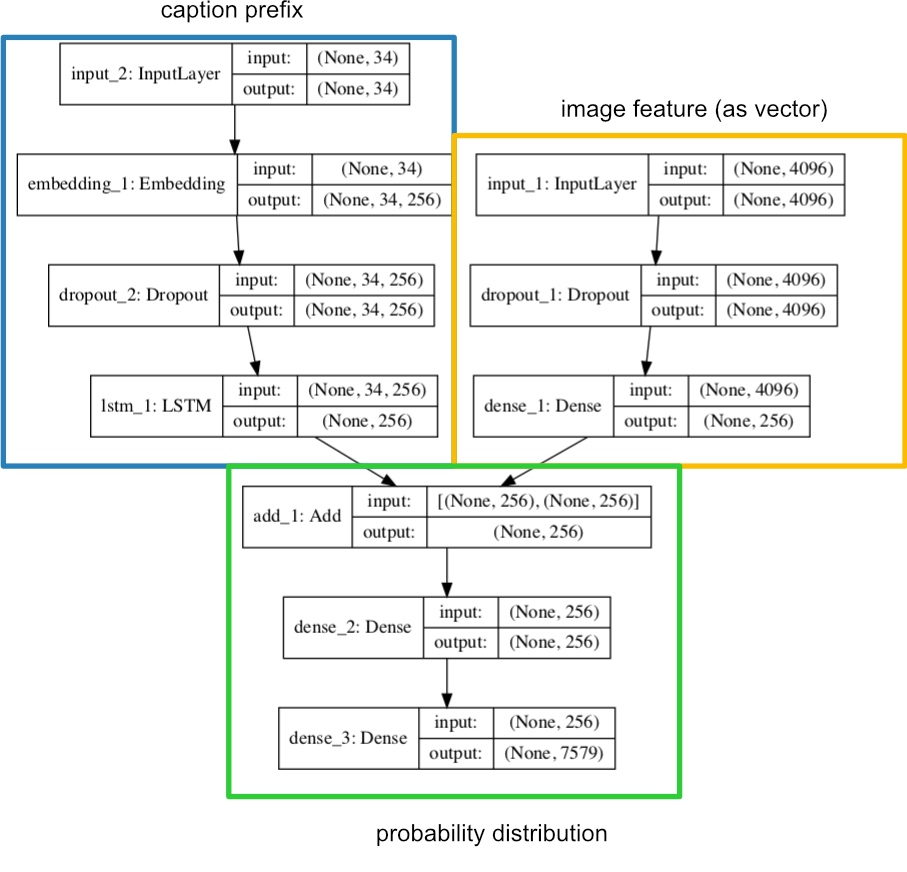
Figure 6: The model structure.
Take away from this part:
In this part, you learned how …
- … the caption generation process works
- … to set up a suitable model with Keras
Training Data Generation
In the following, we will explain how to generate a training set from the given dataset for our model. In general, neural networks work that way, that they learn to map some data X to some target Y, e.g. a label (in case Y is known in the training data, this is known as supervised learning). In our case X consists out of two parts, X1 the image data and X2 the captions aka caption prefixes. As our goal is not to map an image to a specific caption but rather learn the relationship between image features and caption prefixes and between caption prefixes and single words our target Y is not a complete caption in the dataset but a single word. In other words, the model generates a new caption word by word based on a given image feature and a caption prefix. Therefore the caption generation process is an iterative one. After a new word got predicted by the model it will be appended to the existing prefix and will feed into the model again as already explained in the Setup Caption Generation Model part.
What are X1, X2 and Y?
- X1: image feature vector
- X2: caption prefix
- Y: next word
Now consider the following, pre-processed caption from the dataset. You can think of a table, where each row symbolizes one iteration in the model:
"startword person climb up snowy mountain endword"
| X1 (image feature) | X2 (caption prefix) | Y (next word) |
|---|---|---|
| vec(4,096) | 0 0 0 0 0 startword | person |
| vec(4,096) | 0 0 0 0 startword person | climb |
| vec(4,096) | 0 0 0 startword person climb | up |
| vec(4,096) | 0 0 startword person climb up | snowy |
| vec(4,096) | 0 startword person climb up snowy | mountain |
| vec(4,096) | startword person climb up snowy mountain | endword |
You will notice, that we add zeros to some of the caption prefixes. This is the padding we talked about when setting up the caption prefix input for the model. This is necessary since each layer of a neural network has a fixed number of input nodes. Therefore any input sequence has to be of the same length.
In the next step, we have to transform the caption prefixes and our target Y into a machine-readable format. For the caption prefixes, an easy way is to encode each unique word to an integer and replace the actual words by their numeric representation. To encode the words we will use a Tokenizer object from Keras in the following.
To encode our target Y we will use one-hot encoding. This way we kind of simulate a probability distribution for each word in the vocabulary at each step in the learning process where the probability for one word will be 1 and for all other words 0. After encoding our table may look like this:
| X1 (image feature) | X2 (caption prefix) | Y (next word) |
|---|---|---|
| vec(4,096) | [0 0 0 0 0 1] | [0 1 0 0 0 0 0] |
| vec(4,096) | [0 0 0 0 1 2] | [0 0 1 0 0 0 0] |
| vec(4,096) | [0 0 0 1 2 3] | [0 0 0 1 0 0 0] |
| vec(4,096) | [0 0 1 2 3 4] | [0 0 0 0 1 0 0] |
| vec(4,096) | [0 1 2 3 4 5] | [0 0 0 0 0 1 0] |
| vec(4,096) | [1 2 3 4 5 6] | [0 0 0 0 0 0 1] |
Let’s see how we can code this in Python:
To fit a tokenizer on our data, implement the fit_tokenizer() function, which takes the pre-processed descriptions as an input parameter. Once you fit the tokenizer, you may save to object for later use.
To automate the previously described procedure we will implement the create_sequences() function. Its input parameters are a tokenizer object, the preprocessed descriptions, the image features and the length of the longest caption. Each column will now be represented as a list(). The first loop iterates over the image identifier. In the second loop each caption of the selected image will first be encoded by the tokenizer and then be processed in the third loop as follows:
- split the encoded caption into X2 and Y
- add zero padding to X2 (here the
lengthparameter comes into play) - one-hot encode Y
- append each
list()with X1, X2 and Y
Let’s call the function and inspect its outcome:
Train Model
So far we only load training data, to be able to train the model we will also need some test data for cross-validation. You can import and pre-process them the same way as the training data before.
After we generated the training and validation data we can now train the model.
Call the model.fit() function and hand over the training data, number of epochs, callback and validation data.
Keras provides a handy way to monitor the skill of the trained model. At the end of every epoch, we will check the skill of the model with the validation set. If the skill improves we save the model. We will do this via the callback argument. But first, we need to specify where and what Keras should save. Use the checkpoint variable for this. We trained our model for 10 epochs, of cause you can choose a higher number. To train for one epoch takes between 30 and 40 minutes, depending on your hardware setting.
Take away from this part:
In this part, you learned …
- … what a tokenizer does and how to fit it
- … how to generate an appropriate data structure to train the model
- … how to train the model and monitor it process
Caption Generation
So far you have learned how to prepare the image and text data, generate the required data format to train the model and to set up the model itself. In this part, you will learn how to finally predict a new caption for a new image.
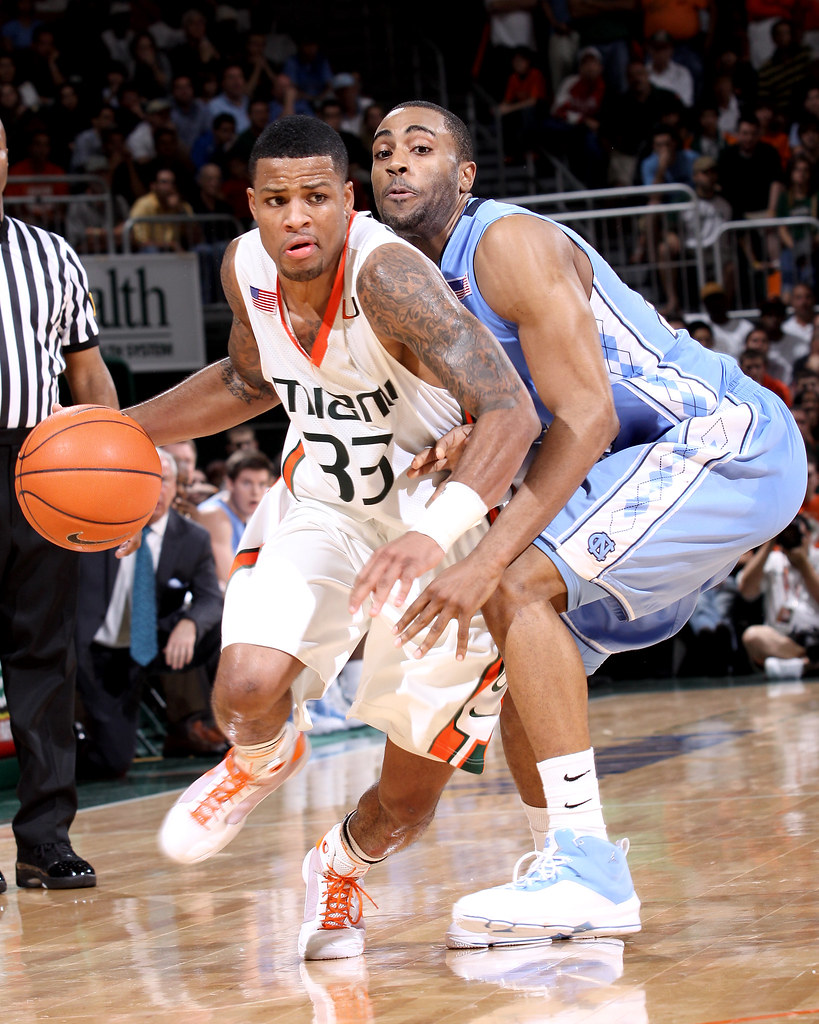
Figure 7: Photo of two basketballers tackling the ball. Photo by [jgirl4858](https://www.flickr.com/photos/jgirl4858/3285180819), some rights reserved.
Let’s implement the generate_caption() function. It takes the following arguments: the model, the tokenizer, an image feature vector and maximum length of the caption. If you have chosen custom start and end sequences you also have to include them, otherwise, go with the default ones.
We will track the probability of each word which was selected by the model to be next. This may give some interesting insides later. We will store this information in the variable probabilities, which is a list. The caption self will be stored in the variable caption as a string. In the beginning, this is equal to the start sequence. Remember, we need this to kick off the generation process as described here.
The following will be run in every iteration of the model until we meet one of the two stopping criteria as described in this part.
- encode the current caption prefix with the
tokenizer - add a zero padding to the prefix
- pass the prefix and the image feature into the
modeland get a probability distribution vectoryhatin return - append the largest probability of
yhatto theprobabilitieslist - save the index of the largest probability in
yhat - map this index to a word in the vocabulary using the
tokenizerand themap_id_to_word()function from the helper package - append the word to the caption
At the end of each iteration, we will print the current length of the caption. Putting it together, the function looks like below:
Now, we can finally generate our first caption. You can download the image in Figure 7 and save it as basketball.jpg in your project folder. Next load the model which performed best in training and the tokenize if the object is no longer alive in your workspace. Otherwise, skip this step. Before we can call the generate_caption() function we need to extract the image feature. Call get_features() and pass the path to the image. Finally call the generate_caption() function.
Let’s take a look at the result. We use the matplotlib package to plot the image.
In the next step, you could get rid of the start and end sequence, but that’s just some syntactic sugar. That’s it. Now you know how to generate a caption for any image out there. In the next part, you will learn how to evaluate the model’s performance and what possible improvements would be.
Take away from this part:
In this part, you learned …
- … how to generate a caption for any new image
Web App
For demonstration purposes we developed a web app for our image caption generation model with the Dash framework in Python. Just drag and drop or select a picture and the web app takes care of the rest. In GitHub you find an instruction how to run the app.
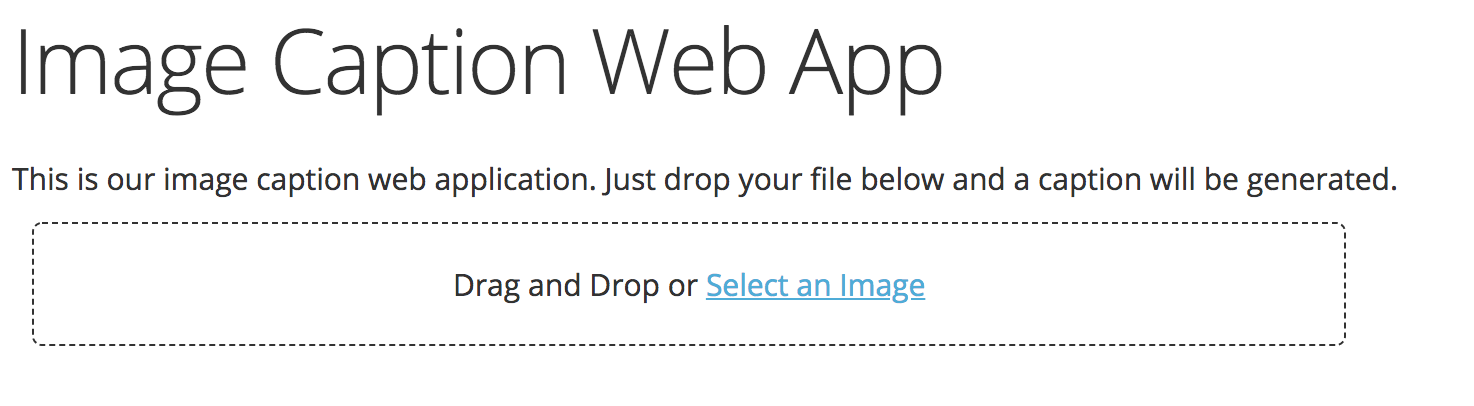
Figure 8: Image Caption Web App
Evaluation
In order to evaluate the performance of our model we test it by means of the BLEU score. The BLEU score was developed to automatically evaluate the quality of machine translations [5]. The closer a automatically translated candidate sentence is to a human translated reference sentence the better it is. The score is calculated by comparing the matching n-grams. As the closeness of a candidate translation to a reference translation is measured this metric can also be used to evaluate the generation of image captions. Here, we compare the closeness of a generated image caption to the original caption.
By means of the NLTK library in Python we calculated the BLEU scores for our model on the flickr 8k testset:
So, the function takes the model, the descriptions of the test set, the features of the test set, the tokenizer and the max_length. The function generates the two lists predicted and actual and saves in them the generated caption by the model and the original captions and then calls the corpus_bleu functions. Before calling the function we need to load all files:
Now we can call the function:
But what does that mean? As seen before in our example caption our model does not perfectly capture the image. Nevertheless, it grasps some key parts. And for a non opimized model it can reasonably keep up with the state of the models. These models reach a BLEU 1 score of 0.69 (respectiveley 0.48, 0.34 and 0.24 for BLEU 2, 3 and 4) on the Flickr8k dataset.
Summary
In this tutorial you learned about the challenge of automatically generating image captions. It is a topic of growing interest in the field of machine learning and in practice it can help for instance visually impaired people of grasping the content of an image. You learned how to approach the right architecture and how to implement the model upon this architecture in Keras. To do so, you used the pre-trained VGG16, where you removed the last layer in order to obtain an image feature vector. To train the model we introduced you to the Flickr8k dataset that fulfills the necessary criteria of human generated conceptual descriptions. Finally, you learned how to evaluate the model by means of the BLEU score. Even though our model can not keep up with the state of the art models, it scores adequately for a non-optimized model on the BLEU score.
References
[1] Michael Grubinger, Paul Clough, Henning Müller, and Thomas Deselaers. The IAPR TC-12 Benchmark – a New Evaluation Resource for Visual Information Systems. 2006.
[2] Micah Hodosh, Peter Young, and Julia Hockenmaier. Framing image description as a ranking task: Data, models and evaluation metrics. Journal of Artificial Intelligence Research, 47:853– 899, 2013
[3] Karen Simonyan and Andrew Zisserman. Very deep convolutional networks for large-scale image recognition. arXiv preprint arXiv:1409.1556, 2014.
[4] Marc Tanti, Albert Gatt, and Kenneth P. Camilleri. Where to put the Image in an Image Caption Generator. arXiv preprint arXiv:1703.09137, 2017.
[5] Kishore Papineni, Salim Roukos,Todd Ward and Wei-Jing Zhu. BLEU: A method for automatic evaluation of machine translation. In Proceedings of the 40th Annual Meeting on Association for Computational Linguistics, pages 311–318. Association for Computational Linguistics, 2002.